Thursday, February 14, 2013

Eat, Sleep, Poop and Spit Up... Ava's first homemade Valentines


Valentine's Day has been my ABSOLUTE FAVORITE holiday since I was a little girl! Every year my Dad would get my sister and I yellow roses and my Mom red ones along with some sort of special present. He taught us the day is about showing family and friends that you value and care for them. Every year I would make special valentines for all my friends and wear as much red, pink, sparkles and hearts as possible.

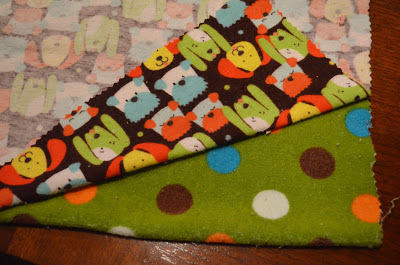
This year is Ava's first Valentine's day and I wanted to make sure it was SUPER special. So I decided Ava would give all of her baby friends custom burp cloths... because what do babies love to do besides sleep and poop? Eat and spit up!

Here is a step by step on how to make these super easy and super cute burp cloths.

You will need
1. Chenille or terry cloth fabric (at least 1 yard)
2. Nursery flannel fabric (I like to use this fabric because it is soft and absorbs better) 
3. Matching Thread


**** Prior to any sewing pre-wash all fabric. The different fabrics will shrink differently in the first wash and you want to make sure that they don't warp and twist because of uneven shrinkage. 

1. Cut 1 piece of fabric 14in x 9in ( I like burp cloths a little bigger so they cover the entire shoulder)


2. Lay the piece of fabric on top of the remaining fabric and continue to cut 14in x 9in rectangles


3. After all pieces are cut place 1 piece of chenille or terry cloth and 1 piece of the patterned flannel right sides together


4. Sew around the edges at 1/3 or 1/4 of an inch. Leave a 3 inch space open on the last side.


5. Clip the fabric on all corners and then pull the right sides of the fabric through your 3" hole and put your fingers in each corner to pop them out. 


6. Flip the seam allowance in on the 3" slit and stitch on top to finish the rectangle. 


7. You will then want to press the fabric to create crisp seams.


Now you have some awesome homemade burp cloths! If you are making them for gifts I recommend you roll them and wrap with a special ribbon. 


Happy Valentine's Day from Ava Ray!!! 
XOXOXO


Now get out there and tell your family and friends that you LOVE them!! 


Friday, February 8, 2013

Fabulous Friday- Fabulous Faces


Remember when having orange skin used to be super cool? Well I guess it was actually never cool but tanning beds used to be all the rage! I tried and tried to go and get a nice sun kissed tan but always ended up burning and looking like a little pink piggy! The older I got the more I realized I was not going to win the "Miss Hawiian Tropic" competition anytime soon and that I needed to start using a higher SPF and embrace my porcelain complexion. I don't want to look 50 when I am 30 or have terrible dark spots and wrinkles so it was time to invest in taking care of my skin!


First things first SUNSCREEN! Sunscreen for the face is very important. You need something oil free that wont clog your pores but lasts all day. The absolute best face sunscreen is Clarins UV Plus. Even though it is only SPF 40 I have NEVER burnt my face when using it. I also invested in some great hats for those long days in the sun.


For everyday use I have 2 different moisturizers. 1 for the summer and 1 for the winter.... high maintenance much?! For most of the year I use Estée Lauder Daywear Plus. It has SPF 15 in it and smells delish... just like cucumbers!


For those chilly harsh winter months it's Clarins HydraQuench all the way! Has SPF 15 and provides incredible hydration!
Babies also need Fabulous Faces!! As a new Mom I was a little concerned when Ava developed a bad case of baby acne and cradle cap on her ears and eyebrows! The acne is totally normal but because it is winter it started drying out and flaking and looked horribly uncomfortable! So with a little research online I found my new "Miracle Baby Cream"... California Baby Calendula cream! This stuff healed the acne and cradle cap in 2 weeks!! Now my sweet girl has her gorgeous skin back and no more stinky cradle cap!! Like I said miracle baby cream and it's natural and safe to use! 


Monday, February 4, 2013

Makeover Monday- Accent Walls and Track Lighting


I really love a lot of things about our Condo. I love that we are .2 miles from Target, Kohls, Joann Fabrics; .4 miles from Walmart, Whole Foods, Trader Joes and the Cal Train station. I love that everyone in our building is 50+ and most have lived here since these units were built in 1970. I like that it's quiet, except for at 7:59 on Monday morning when the dump trucks come for 15 minutes to get trash and recycling. And I love that it's less than 10 minutes away from Google so Peter can be home as soon as he is done working. 

The one thing I don't love is how our landlord had an obsession with painting accent walls and track lighting. The track lighting isn't that bad, always an interesting conversation starter but the accent walls were a little over the top! When we moved in we had an accent wall in every room. I don't quite understand the point of accent walls. It looks like you just couldn't commit to the color so you just decided to paint one wall to see how it goes. Now accent walls that are a shade lighter or brighter than the rest of the room create nice depth but when the whole room is cream and you have a random sienna/brick red wall it looks super dumb. That's what we were dealing with... 

The guest room was taken care of quickly with 4 coats of pink paint on the lovely sage green accent wall and 1 coat of pink paint everywhere else for Ava's room. Peter truly enjoyed painting that one wall 4 times... just ask him about it ;) 


The dining room I actually kinda liked. There was a nice greyish wall that we were able to hang a cool metal candle holder on. Love that track lighting. 


But the bedroom... brick/sienna red surronded by cream... AHHHH 1996 called and they want their paint color back! 


For a month I tried to convince Peter we needed to paint it but he was a little worn out after the 2 days it took him to paint Ava's room so I decided that I could make this horrible color work. We had this set of 6 pictures in our dining room in our old house and I noticed the horrible red color was actually in some of the images. With my Mom's help ( I was 7 months pregnant when I decided to finish the room.... extreme nesting moment) we hung 3 on the accent wall and 2 on the other wall. Framed the room with some cool lamps and hung a big mirror over the dresser. We got some neutral curtains to pull everything together. 


It's not my favorite color but at least it looks a little more like home.